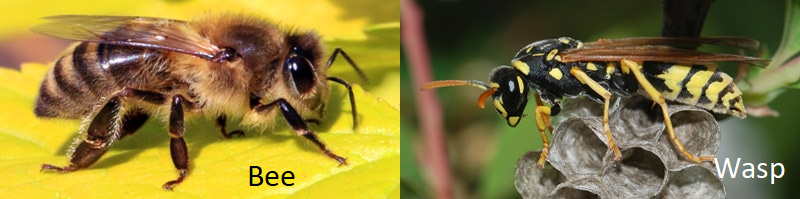
Spring is here and most of us are looking forward to spending some more time outside, but while we’re all enjoying being out in the open air no one will enjoy being stung by a honey bee or European wasp. Unfortunately, European wasps are often mistaken for bees. Bees are usually more interested in the pollen or nectar on flowers than people, but European wasps however much more aggressive, they are attracted to food and drink, do not die when they sting and can sting repeatedly. While it is quite easy to step on a bee and be stung when walking around barefoot, wasps are considered more dangerous because even a single individual can be provoked into attacking humans and will ruthlessly defend their nest or their prey. While the wasps and bees have similar colouring, being both yellow and black, there are many physical differences between the two. Bees are fuzzy and stockier while wasps are longer and thinner and fuzz free. Bee legs are black while the wasp’s legs are yellow. Wasp antennae are also longer and thicker than the common honey bee. Nicknamed the “killer wasp”, It is best not to swat at a passing European wasp as you do not want to anger it.
But there is good news! Catching queens is the best and most environmentally sound method of reducing European wasps. Catching one Queen in Spring as she comes out of hybrnation looking for food means you reduce a colony of 100,000 or more wasps ruining your BBQ in Summer! This spring wasp trap recipe is for springtime and early summer only and is dedicated to catching queen European wasps only and shouldn’t kill your local bees.
SPRING QUEEN WASP TRAP:
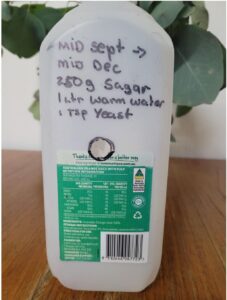
Made from a clear 1.25L PET bottle (soft drink bottle, Milk, Orange juice or any similar container) with a lid. Make a hole 13 -20 mm diameter about 10cm – 12 cm (100mm – 120mm) from the base of the bottle on each of 3 sides of the bottle opposite the handle. The hole diameter is not millimetre critical but does need to be large enough for the queen wasp to enter and small enough so she cannot easily find her way out. you can drill or just cut an X in the bottle and push the flaps in. The number of holes is to maximise the entry points and leaving a side free allows you to empty the trap and refill without getting dead wasp juice all over you!
BAIT:
• Dissolve 250g sugar in 1 litre ml warm water.
• Stir until dissolved. Cool until body temp.
• add 1 tsp yeast.
• You should end up with around 1.3 litres of mixture
Some people like to add a tablespoon or two of honey or some blended apple fruit scraps per trap.
The above recipe makes enough for (about) 2 traps. Allow 12 days for the mix to ferment. Time to ferment depends on ambient air temperature.
Optional: add a drop of dishsoap to break the surface tension and make it even easier for the wasps to drown.
How can I tell if the mix is fermenting?
When the mix is fermenting it will bubble and foam slightly and have a yeasty smell. Sometimes it’s not obvious until you shake the container a little. You may notice bubbles clinging to the inside of
the container If you have the above sugar content correct it should begin to ferment withing an hour. Place the bait mixture in a warm place for 1-2 days for the solution to ferment (fermenting will stop
bees being attracted) If fermenting seems slow add another teaspoon of yeast or keep warm. Old yeast will not ferment as easily. Check the use by date. Fermentation is important so that bees don’t take the bait. The CO2 released by fermentation may also have a role to play in attracting wasps.
TIME OF YEAR:
Because hibernation is dependant on daily temperatures it is difficult to advise on best time however mid-September and October seem to be the best in NE Vic. Temperatures appear to need to be above 15 C with a few days at 20C or more. Timing is not enormously critical as queen wasps forage for a considerable period after establishing a nest but it is best to have traps out as early as possible.
LOCATION:
Hang in a sunny spot in garden. Near a wood heap or pile of sticks is also good as queens hibernate under bark. Hang the trap anywhere fruit trees or where wasps are likely to forage. Height is not critical but 1 – 2 meters in the air seems good. Whilst there is nothing to harm people, pets or the environment in the bait, traps should be hung out of the reach of children and pets simply to avoid interference. Shake every few days to let bait dribble out. Keep in place until (December). Strain out when full, reuse and top up bait with water if necessary. Replace or top up bait every few weeks. The mixture does tend to evaporate so keep an eye on it. Folk are having success with older bait but there could be many reasons for this apart from the age of the bait. Feel free to experiment.
HOW MANY TRAPS?
2 – 4 traps for the average house block. Larger areas should consider 4 traps per Ha or 100 meters
apart on boundary lines.
CATCHING OTHER INSECTS
Honeybees are not attracted because of the carbon dioxide released by the fermenting yeast however we encourage users to monitor for by-catch and remove traps if you are concerned about what has been caught.
Monitor your traps for by-catch daily at first. Then check weekly. If you are catching something you are concerned about withdraw the trap and reassess. You may simply need to wait a day or two more for the bait to ferment or add another teaspoon of yeast. It should be noted that catching one or two bees or native wasps, while not ideal, is not the end of the world. European wasps kill many bees, paper wasps, and other beneficial pollinators each day so the loss of one or two bees is not really an issue.
ANTS
If you get ants in your trap you will need to start over. Wasps will not go anywhere near anything contaminated by ants. Wash the trap out thoroughly with hot soapy water and rinse well before rebaiting. You can try spraying the branch your trap hangs from and the string you hang the trap with fly spray/surface spray/wasp spray. Make sure you spray BEFORE you hang the trap so that insect spray does not contaminate traps. Spraying the branch does not seem to deter the wasps from visiting traps. Another method is to stand the trap in a pot plant saucer or bucket with a little water in it. Check the bucket/saucer occasionally and top up the water as required.
Notes:
Don’t be concerned if you don’t catch anything immediately. It may take some time to catch queen wasps. Check traps weekly and top up if required. Some people complain because they didn’t catch anything. It probably means there were no queen wasps within foraging distance: On the other hand, many people tell me they catch 20 or 30 queens in one trap a month or more after placing the trap out. A real difference can be made by working together with neighbours and community groups to cover larger areas such as river banks, parks, and vacant land.
Source: Keith Padbury (Mansfield and Delatitie bee group MADbeegroup@gmail.com)